Competitions
Preparing your images
Preparing images correctly for PDI competitions is an important part of successful competition entry. Correct image sizing, colour space settings and metadata ensure your photographs display accurately during judging and meet competition requirements.
Submission of entries
Club entries close at 23h59 on the Sunday before club night. Entries must be submitted online to www.photovaultonline.com.
- A maximum of four images per member per month: three in any category plus one Theme image. Without a Theme image, three images.
- JPEG file format.
- File size may not exceed 2 MB.
- Images must be resized to a maximum of 1920 pixels on the horizontal axis or a maximum of 1080 pixels on the vertical axis.
- It is recommended that the image is converted to the sRGB colour profile to ensure correct colour rendition during display and adjudication.
- Borders are optional, but within the size restraints as described.
- No title, watermark or identification of the maker of the image shall be visible anywhere on the image.
- An acknowledgement of receipt of such an entry will be sent to the entrant automatically via PhotoVault Online once the entrant has finalised his or her entry. If no entry confirmation is received within three working days, contact the competition secretary.
Video supplied by Savas South African Visual Arts Society (https://www.savas.org.za/)
This guide explains the recommended dimensions, sRGB colour space requirements and export settings used for club and salon competitions. Whether you work in Adobe Photoshop, Lightroom, Elements or similar editing software such as Affinity Photo, the overall process remains very similar.
Following these guidelines helps ensure:
- Accurate colour reproduction
- Maximum image sharpness on projection systems
- Consistent presentation for judging
- Correct recording of titles and photographer information
Incorrect sizing, colour settings or missing metadata may result in entries being rejected or returned for correction, so taking a few extra moments during export can save disappointment later.
The tutorials below will guide you step-by-step through preparing your images correctly for competition submission.
Photoshop: Image, Image Size
Resolution: Any aspect ratio may be used but the maximum vertical size is 1080 pixels, and the horizontal limit is 1920 pixels which is the native resolution of the equipment that will be used.
File Size: should not exceed 2000Mb.

For Portrait format images tick resample and constrain proportions and in Height insert 1080 pixels and check width is less than 1920 pixels. As you are reducing the size of the image select “Bicubic Sharper”. Click “OK”

Landscape format images tick resample and constrain proportions and in “Width” insert 1080 and check “Height” is less than 1920 pixels As you are reducing the size of the image select “Bicubic Sharper (best for reduction)”. Click “OK”
Convert to sRGB
First if you have layers in your image on the top menu bar click Layer and then Flatten Image.
Photoshop: Edit, Convert to profile
Select sRGB IEC61966-2.1 – click OK

What is the difference between RGB and sRGB?
Firstly, the colour gamut (spectrum) that we are able to see with our eyes is much wider than the gamut that a screen or projector can display.
- In computer terms we have Adobe RGB and sRGB. The gamut of Adobe RGB is wider than sRGB.
- The camera should always be set on Adobe RGB as you want to capture as wide a range of colours as possible when you take the picture.
- The minimum processing then takes place in camera.
- The picture is processed in Photoshop in Adobe RGB.
- I save my pictures in the original large format and in Adobe RGB as a PSD (Photoshop format).
- PSD is a “lossless” system.
- Jpeg is a “lossy” system which does its own compression. This is not ideal as you have less control.
- You can return to the PSD file and rework it if needed.
- You then resize the image for printing or projection purposes, and then change it to a Jpeg and convert to sRGB profile Photoshop
Francois Roux, PSSA
EXIF Data
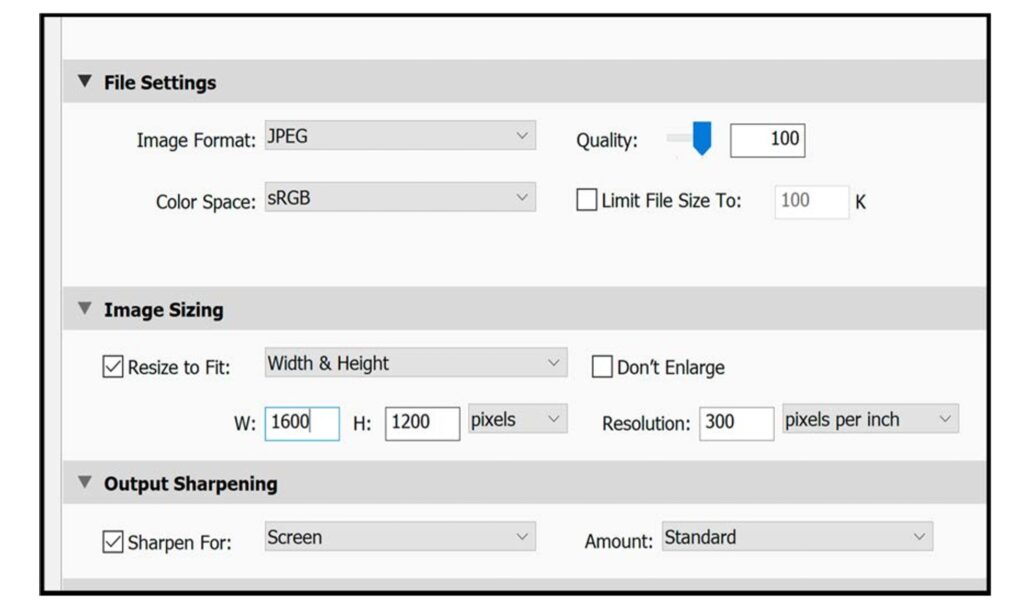
You now need to add the EXIF data so that the Competition Secretary can display your image and record your score.
From the top menu bar select File, then File Info:
Saving your file
You are now ready to save your image as jpeg.
- From the top menu bar click on File, Save As (not Save!!)
- In Format select JPEG from the drop down list (click on down arrow to right of box).
- In the File Name box type in the name of the image. Do not put your name after the image title. Certain punctuation characters within image titles are undesirable. These are: , # & / : ; * " ~ < > | ? \
- Either create a new folder or select a folder to save your image. Later you will need to attach to an email or upload to facebook so pick a location you can find again! Now click on Save.
You will see this dialogue box.

- If not already selected choose quality as Maximum and 12, use Baseline Standard.
- Click Ok – You have now saved the file with the new filename, sRGB colour space at the correct resolution and with the EXIF data added.
In Abobe Lightroom
Adobe Lightroom also permits the adding of EXIF data but it works in a different way, details being as follows:

Export your image to a suitable location on your computer (undertaken by right-mouse click on the image – see details below) OR
- open image in Photoshop/Elements and follow the instructions previously given above.
- Name image (Image Title e.g. “Frosty Divide).
- Do not put your name after the image title.
- Certain punctuation characters within image titles are undesirable.
- These are: , # & / : ; * " ~ < > | ? \

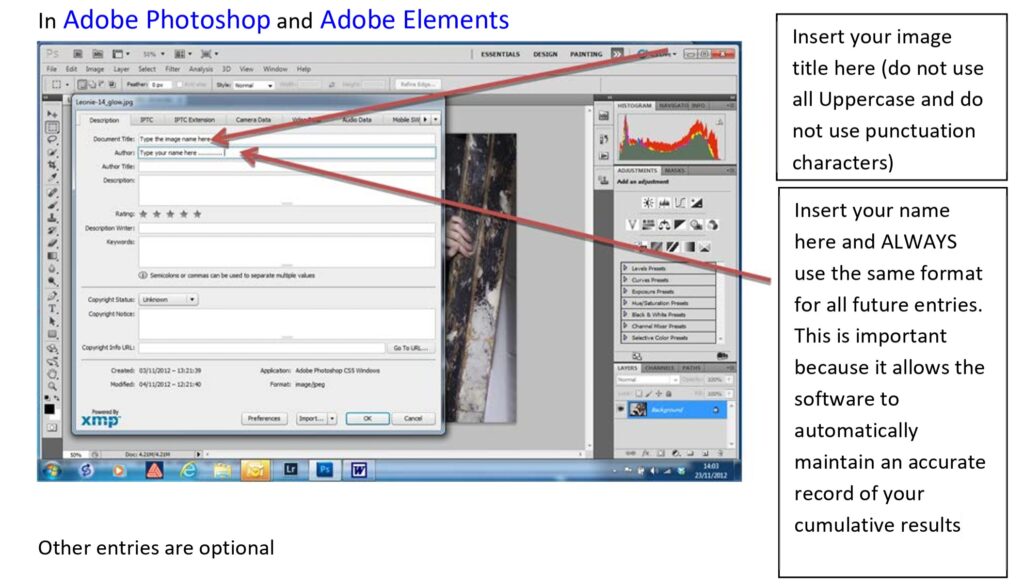
- Now chose right colour space, insert max pixel size, etc as shown here: